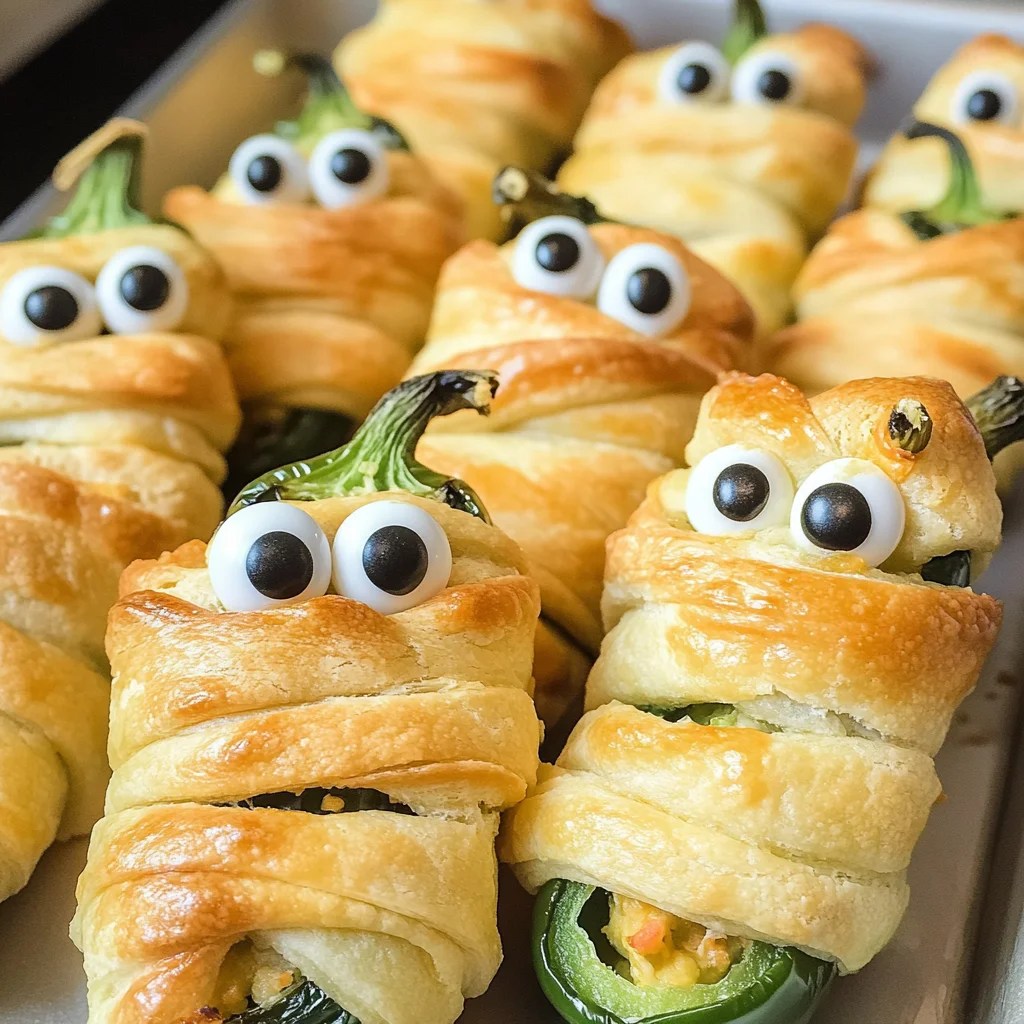
Jalapeño Popper Mummies
If you’re looking for a fun and delicious appetizer that will wow your guests, you’ve come to the right place! These Jalapeño Popper Mummies are not only adorable but also packed with flavors that everyone loves. Imagine creamy cheese filling nestled inside spicy jalapeños, all wrapped up in flaky crescent dough. It’s a delightful treat for Halloween parties, family gatherings, or just a cozy night in. Plus, they come together quickly, making them perfect for busy weeknights!
Every bite of these Jalapeño Popper Mummies is sure to bring smiles to your table. They’re easy to make and even easier to devour – trust me, they won’t last long!
Why You’ll Love This Recipe
- Quick and Easy: This recipe takes only 25 minutes from start to finish, so you can whip them up in no time!
- Family-Friendly: With their fun appearance and tasty filling, even the pickiest eaters will love these poppers.
- Customizable: Feel free to tweak the ingredients based on what you have at home or your taste preferences.
- Perfect for Parties: These spooky snacks are sure to be a hit at any gathering or celebration.
- Make Ahead: Prepare the filling in advance and assemble them right before baking for an effortless appetizer.
Ingredients You’ll Need
Let’s gather some simple and wholesome ingredients for our Jalapeño Popper Mummies. You might already have some of these in your kitchen!
For the Poppers
- 8 jalapenos
- 1 (8 ounce) package of crescent dough sheets
- 1 (8 ounce) package of cream cheese, softened
- 3 tablespoons sour cream
- ¼ cup bacon bits
- ½ cup Colby jack cheese, shredded
- ½ tablespoon garlic powder
- ¼ tablespoon onion powder
- 1 teaspoon red pepper flakes
- 1 teaspoon black pepper
For the Decoration
- 32 small candy eyes
Variations
This recipe is flexible and allows for lots of creativity! Here are a few fun variations you can try:
- Switch the Cheese: Use pepper jack or cheddar cheese instead of Colby jack for an extra kick.
- Add Veggies: Incorporate finely chopped bell peppers or green onions into the cream cheese mixture for added flavor and texture.
- Make it Spicy: Add more red pepper flakes or even some diced jalapeños into the filling if you love heat!
- Go Vegan: Substitute cream cheese with a plant-based alternative and use vegan bacon bits for a cruelty-free version.
How to Make Jalapeño Popper Mummies
Step 1: Preheat Your Oven
Begin by preheating your oven to 400 degrees Fahrenheit. This ensures that your Jalapeño Popper Mummies bake evenly and become golden brown. Line a baking sheet with parchment paper for easy cleanup afterward.
Step 2: Prepare the Jalapeños
Slice each jalapeño lengthwise and scoop out the seeds using a spoon. This step is crucial as it creates space for that delicious cream cheese filling while also reducing some of the spiciness.
Step 3: Make the Cream Cheese Mixture
In a large bowl, combine softened cream cheese, sour cream, bacon bits, shredded Colby jack cheese, garlic powder, onion powder, red pepper flakes, and black pepper. Mix until everything is well blended. This creamy mixture is the star of your poppers!
Step 4: Fill the Jalapeños
Transfer your cheesy filling into a piping bag or a ziplock bag with one corner cut off. Fill each hollow jalapeño half generously with the mixture. Place them on your lined baking sheet about an inch apart to give them room to expand while baking.
Step 5: Wrap with Crescent Dough
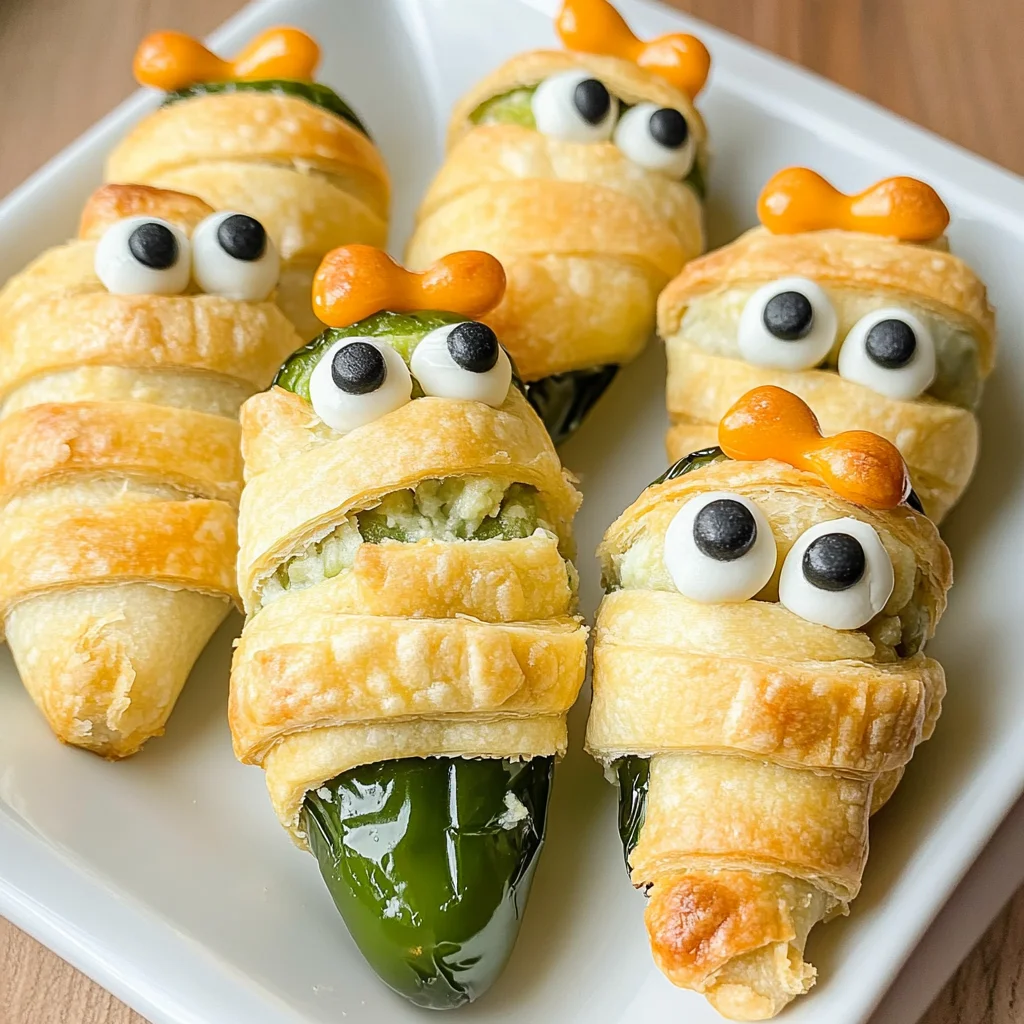
Take your crescent dough sheet and cut it into 16 strips using a small knife. Wrap each stuffed jalapeño with one strip of dough in a spiral fashion from top to bottom. Leave some space at the top so we can add those cute candy eyes later!
Step 6: Bake to Perfection
Place your baking sheet in the preheated oven and bake for about 10-12 minutes or until the crescent dough turns golden brown. Keep an eye on them; we want that perfect crispy exterior!
Step 7: Add Eyes and Serve
Once baked, remove them from the oven and carefully add two candy eyes to each jalapeño where you left space at the top. Serve warm and enjoy these spooky yet scrumptious Jalapeño Popper Mummies – they’re bound to be a crowd favorite!
Pro Tips for Making Jalapeño Popper Mummies
Creating these adorable Jalapeño Popper Mummies is a breeze with a few helpful tips to ensure they turn out perfectly every time!
-
Choose the right jalapeños: Opt for medium-sized jalapeños for the best balance of flavor and heat. They’re typically easier to handle and stuff, making your prep smoother.
-
Soften the cream cheese properly: Make sure your cream cheese is softened at room temperature. This ensures a creamy and easy-to-pipe filling that coats the jalapeños evenly.
-
Avoid overstuffing: While it’s tempting to pack in the filling, leaving a little space at the top allows you to wrap the crescent dough more easily and keeps everything from spilling out during baking.
-
Watch your baking time: Ovens can vary, so keep an eye on your Jalapeño Popper Mummies as they bake. You want them golden brown but not overcooked, which ensures a flaky texture.
-
Experiment with fillings: Feel free to switch up the cheese or add other ingredients like diced bell peppers or assorted spices. Customizing your filling can take these mummies to new heights of deliciousness!
How to Serve Jalapeño Popper Mummies
Serving these spooky treats can be just as fun as making them! With their festive appearance, they make for an eye-catching appetizer at any gathering.
Garnishes
-
Chopped cilantro: A sprinkle of fresh cilantro adds a pop of color and a burst of freshness that complements the creamy filling beautifully.
-
Sour cream drizzle: A simple drizzle of sour cream on top adds creaminess while enhancing the flavor. Plus, it looks great!
Side Dishes
-
Guacamole: This creamy avocado dip pairs perfectly with the heat of jalapeños, cooling down each bite while adding rich flavor.
-
Tortilla chips: Crunchy tortilla chips are a classic pairing that brings texture contrast and makes for a fun dipping experience alongside your mummies.
-
Mexican street corn salad: A vibrant salad featuring sweet corn, lime juice, cheese, and spices offers a refreshing counterbalance to these savory bites.
With these serving suggestions, your Jalapeño Popper Mummies will not only taste fantastic but also look delightful on any table. Enjoy every spooky bite!
Make Ahead and Storage
These Jalapeño Popper Mummies are not only a fantastic treat for Halloween, but they also make for great meal prep! You can easily whip up a batch ahead of time and store them for your next gathering or as a quick snack.
Storing Leftovers
- Allow the Jalapeño Popper Mummies to cool completely before storing.
- Place them in an airtight container.
- Store in the refrigerator for up to 3 days.
Freezing
- To freeze, ensure that the poppers are fully cooled.
- Arrange them in a single layer on a baking sheet and freeze until solid.
- Transfer them to a freezer-safe bag or container and label with the date. They can be frozen for up to 2 months.
Reheating
- Preheat your oven to 350°F (175°C).
- Place the poppers on a baking sheet lined with parchment paper.
- Bake for about 10-15 minutes, or until heated through and crispy.
FAQs
Here are some common questions you may have about making Jalapeño Popper Mummies!
Can I use other types of cheese in Jalapeño Popper Mummies?
Absolutely! Feel free to experiment with different cheeses like cheddar or pepper jack for added flavor.
How do I make Jalapeño Popper Mummies spicier?
For spicier poppers, leave some seeds in the jalapeños or add more red pepper flakes to the cream cheese mixture.
Can I prepare Jalapeño Popper Mummies in advance?
Yes! You can make these delicious snacks ahead of time and store them in the fridge or freezer, making them perfect for meal prep.
What can I serve with Jalapeño Popper Mummies?
These mummies pair wonderfully with dipping sauces such as ranch, sour cream, or guacamole.
Are Jalapeño Popper Mummies suitable for kids?
Yes! If your kids enjoy a little spice, they’ll love these fun and festive treats. Just be mindful of their spice tolerance!
Final Thoughts
I hope you have as much fun making these adorable Jalapeño Popper Mummies as I did! They’re not only festive but also packed with flavor—perfect for any gathering or cozy night in. Enjoy the process, get creative with your fillings, and don’t hesitate to share this recipe with friends and family. Happy cooking!
Jalapeño Popper Mummies

Get ready for Halloween with these spooky delicious Jalapeño Popper Mummies! Easy to make and perfect for sharing—try this fun recipe today!
- Prep Time: 10 minutes
- Cook Time: 12 minutes
- Total Time: 22 minutes
- Yield: Makes approximately 16 Jalapeño Popper Mummies 1x
- Category: Appetizer
- Method: Baking
- Cuisine: Tex-Mex
Ingredients
- 8 jalapeños
- 1 (8 ounce) package of crescent dough sheets
- 1 (8 ounce) package of cream cheese, softened
- 3 tablespoons sour cream
- ½ cup shredded Colby jack cheese
- 1 teaspoon garlic powder
- 1 teaspoon red pepper flakes
- 32 small candy eyes
Instructions
- Preheat your oven to 400°F (200°C) and line a baking sheet with parchment paper.
- Slice each jalapeño lengthwise and remove seeds.
- In a bowl, mix cream cheese, sour cream, shredded cheese, garlic powder, and spices until well combined.
- Fill each jalapeño half with the cheese mixture using a piping bag.
- Cut crescent dough into strips and wrap each stuffed jalapeño in a spiral fashion.
- Bake for 10-12 minutes until golden brown.
- Add candy eyes after baking and serve warm.
Nutrition
- Serving Size: 1 popper (40g)
- Calories: 130
- Sugar: 1g
- Sodium: 250mg
- Fat: 9g
- Saturated Fat: 4g
- Unsaturated Fat: 5g
- Trans Fat: 0g
- Carbohydrates: 9g
- Fiber: 1g
- Protein: 4g
- Cholesterol: 15mg