Vampire Oreo Pops
If you’re looking for a fun and festive treat this Halloween, you’ve come to the right place! These Vampire Oreo Pops are not only irresistibly cute, but they are also super simple to make. I love whipping these up when friends and family gather for spooky celebrations. They’re a delightful way to get everyone in the Halloween spirit, and trust me, they’ll disappear faster than you can say trick or treat!
These pops are perfect for busy weeknights or when you’re planning a get-together with loved ones. Everyone will enjoy the deliciously sweet flavors, and they’re easy enough for kids to help with too. Let’s dive into this fang-tastic recipe!
Why You’ll Love This Recipe
- Super Easy to Make: With just a few simple steps, you’ll have these adorable treats ready in no time.
- Family-Friendly Fun: Kids love getting involved in the kitchen, and decorating these pops is a great way for them to unleash their creativity.
- Perfect for Any Occasion: Whether it’s Halloween or just a fun dessert night, these Vampire Oreo Pops fit right in!
- Customizable Colors: You can easily swap out candy melt colors to match any theme you’re going for!
- Deliciously Sweet: Combining Oreos with candy melts creates an irresistible treat that everyone will adore.
Ingredients You’ll Need
These Vampire Oreo Pops use simple and wholesome ingredients that you probably already have on hand. Let’s gather what we need!
- Oreos
- Lavender candy melts (you could also use black candy melts, white candy melts, or red candy melts)
- Mini vegan marshmallows
- 1-2 teaspoons of coconut oil
- Cupcake liners: Red (or purple, black, green are good colors to use)
Variations
One of the best parts about making Vampire Oreo Pops is how flexible the recipe is! Here are some fun variations you might want to try:
- Change Up the Colors: Use orange and purple candy melts for a more whimsical Halloween vibe!
- Add Some Crunch: Dip your pops in crushed nuts or sprinkles after coating them with chocolate for an extra texture.
- Switch Up the Cookies: Try using different flavored cookies like mint or peanut butter Oreos for a unique twist.
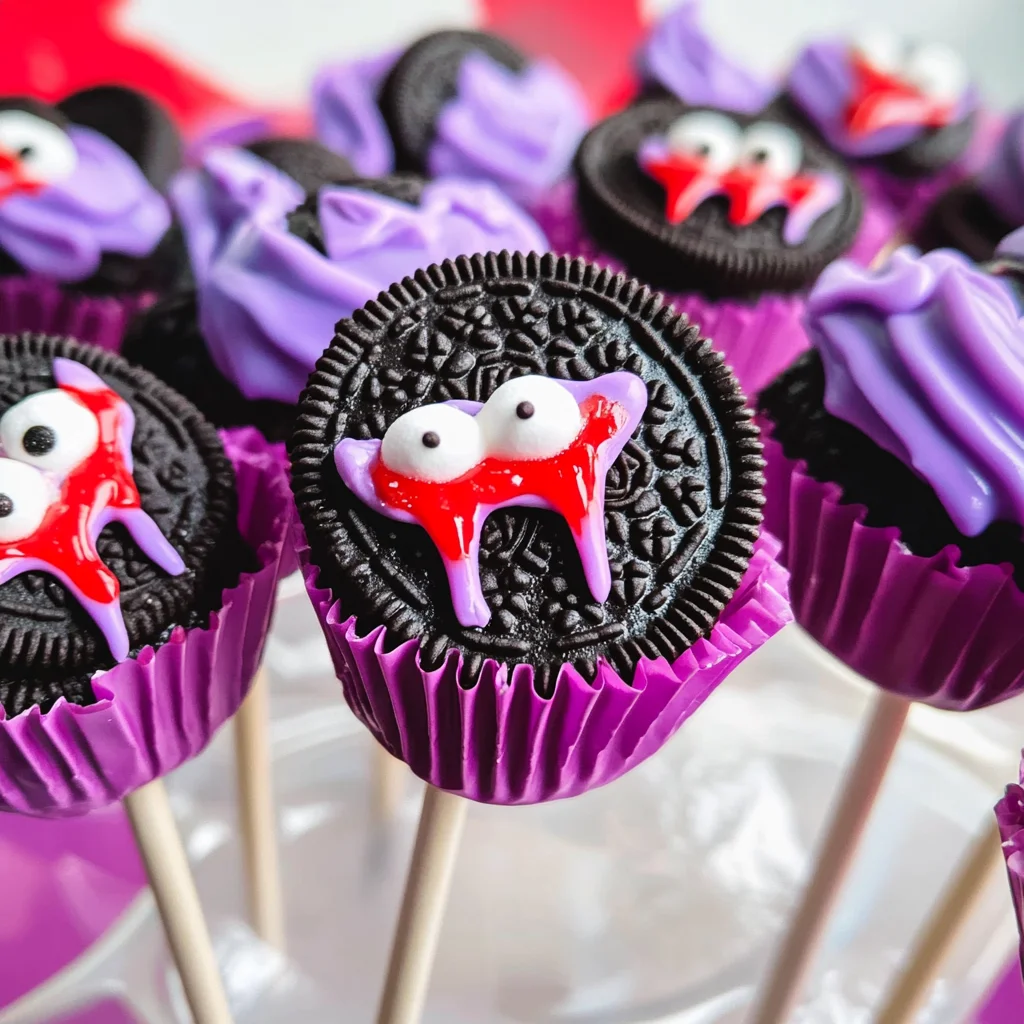
- Make Them Ghoulish: Use edible eyes instead of marshmallows to create different spooky characters!
How to Make Vampire Oreo Pops
Step 1: Melt the Candy
Start by melting your lavender candy melts in a microwave-safe bowl. Heat them in 30-second intervals, stirring between each until smooth. This step is crucial because perfectly melted chocolate helps your pops look glossy and delicious. Don’t rush it; patience pays off here!
Step 2: Prepare the Oreos
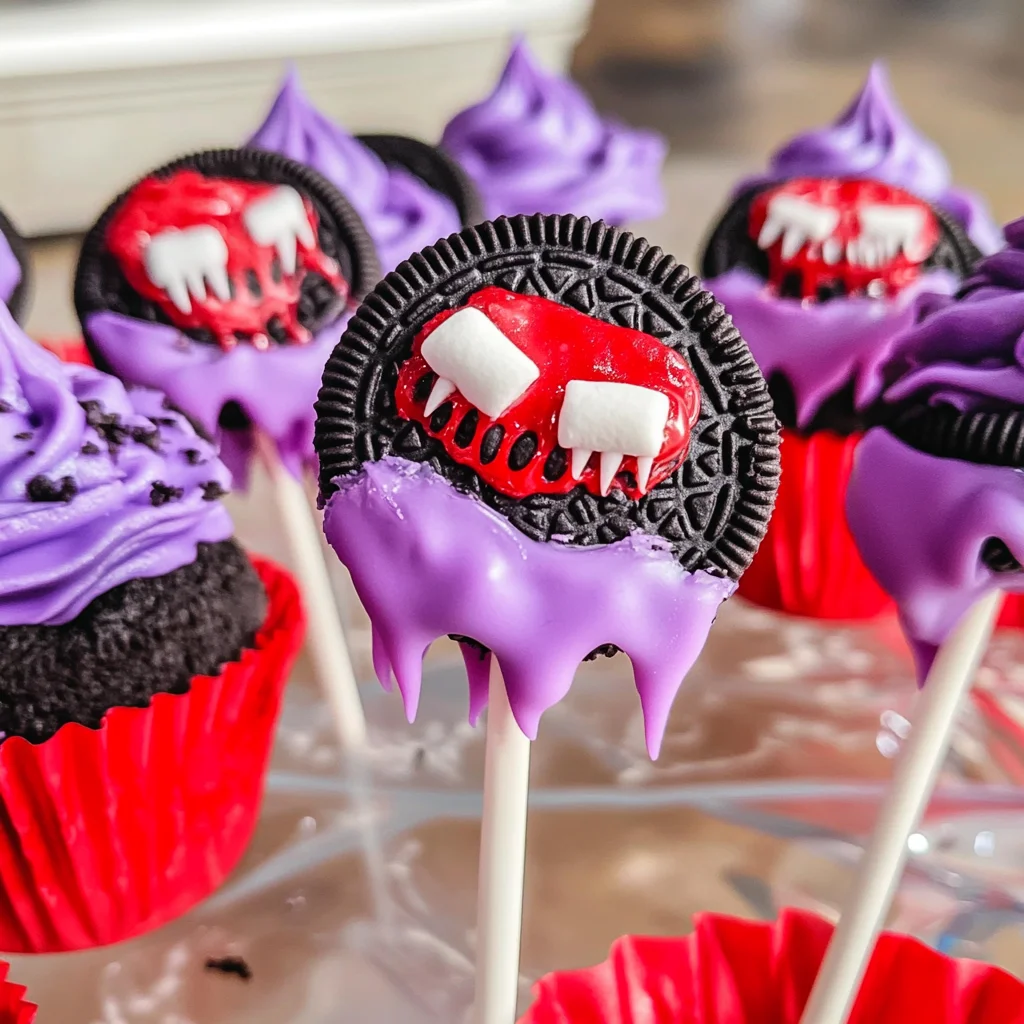
Carefully insert lollipop sticks into the cream filling of each Oreo cookie. This is where the magic happens! The sticks will hold everything together when we dip them later. Plus, it makes them easy to eat!
Step 3: Dip the Oreos
Once your candy melts are ready, dip each Oreo into the melted mixture until fully coated. Allow any excess chocolate to drip off before placing them on a baking sheet lined with parchment paper.
Step 4: Add Marshmallow Fangs
While the chocolate is still wet, press mini marshmallows onto either side of the Oreo to create those adorable vampire fangs! This adds character and charm while giving your pops that spooky flair.
Step 5: Let Them Set
Place your dipped Oreos in cupcake liners and let them sit at room temperature until fully set. If you’re short on time, pop them in the fridge for about 10-15 minutes! This final step ensures they’ll hold their shape during serving.
And there you have it—your very own Vampire Oreo Pops ready to impress! Enjoy making these delightful treats together with friends or family; they’re sure to bring smiles all around!
Pro Tips for Making Vampire Oreo Pops
Creating these delightful Vampire Oreo Pops is not only fun but also brings out your creative side! Here are some tips to ensure your treats turn out perfectly spooky.
-
Use room temperature ingredients: Letting your ingredients sit at room temperature helps the candy melts melt evenly, preventing clumps and ensuring a smooth coating on your Oreos.
-
Experiment with colors: Don’t be afraid to mix and match the candy melts to create unique designs. This can add a personal touch that will impress your guests and make your treats stand out.
-
Chill before decorating: After coating the Oreos in candy melts, refrigerate them for about 10 minutes. This helps the chocolate set quickly, making it easier to decorate without smudging.
-
Practice piping skills: If you’re using a piping bag for details like fangs or eyes, take some time to practice on parchment paper first. This way, you’ll feel more confident when you’re ready to decorate the pops.
-
Have fun with presentation: Use colorful cupcake liners or fun serving platters to display your Vampire Oreo Pops. A well-presented treat is always more appealing and adds to the festive atmosphere!
How to Serve Vampire Oreo Pops
Serving these adorable treats can elevate your Halloween party or get-together! Here are some creative ideas for presenting your Vampire Oreo Pops.
Garnishes
- Sprinkles: Add a dash of edible glitter or Halloween-themed sprinkles on top for an extra pop of color and festivity.
- Chocolate drizzle: Drizzle melted white chocolate across the pops for an elegant touch that also enhances flavor.
- Candy eyes: Use small candy eyes on top of each pop for a playful twist that makes them even more whimsical!
Side Dishes
- Pumpkin Spice Muffins: These moist muffins bring in seasonal flavors that complement the sweet Oreo pops, making them perfect for fall gatherings.
- Apple Slices with Caramel Dip: Crisp apple slices paired with a creamy vegan caramel dip provide a refreshing contrast to the sweetness of the pops.
- Vegetable Platter with Hummus: A colorful medley of fresh veggies served with hummus offers a healthy balance and provides a nice crunch between sweet bites.
- Popcorn Mix: Create a Halloween-themed popcorn mix by tossing popcorn with dark chocolate chips and festive sprinkles. This adds a salty-sweet element that’s sure to be a hit!
Now you’re all set to whip up these fun and spooky Vampire Oreo Pops! Enjoy getting creative in the kitchen, and don’t forget to share your creations with friends and family!
Make Ahead and Storage
These Vampire Oreo Pops are fantastic for meal prep, allowing you to whip up a batch in advance and have them ready for any Halloween gathering or sweet craving.
Storing Leftovers
- Store the pops in an airtight container at room temperature for up to 3 days.
- If you live in a warm climate, consider refrigerating them to maintain their shape and texture.
Freezing
- To freeze, place the pops on a baking sheet lined with parchment paper.
- Freeze for about 1-2 hours until solid, then transfer them to a freezer-safe bag or container.
- These can be stored in the freezer for up to 1 month. Just make sure to let them thaw at room temperature before enjoying!
Reheating
- There’s no need to reheat these treats, as they are best enjoyed chilled or at room temperature.
- If they’ve been frozen, allow them to thaw naturally for a delightful snack!
FAQs
Here are some common questions about making Vampire Oreo Pops.
Can I customize the colors of my Vampire Oreo Pops?
Absolutely! Feel free to use any colored candy melts that match your Halloween theme. Black, purple, and green work wonderfully!
How do I make Vampire Oreo Pops?
Making Vampire Oreo Pops is simple! Just dip Oreos into melted lavender candy melts, decorate with mini marshmallows and red candy melt blood, and let them set. Enjoy your fun Halloween treat!
Can I use regular marshmallows instead of mini vegan marshmallows?
If you’re not concerned about dietary preferences, regular marshmallows can certainly be used. However, keep in mind that they won’t be suitable for vegan diets.
How long do Vampire Oreo Pops last?
These delicious treats can last up to 3 days at room temperature if stored properly, or they can be frozen for up to a month.
What occasions are perfect for serving Vampire Oreo Pops?
These spooky pops are ideal for Halloween parties, school events, or simply as fun treats during the fall season!
Final Thoughts
I hope you have as much fun making these Vampire Oreo Pops as I did! They’re not only adorable but also perfectly sweet—making them the ideal treat for any occasion. Whether you’re sharing them with friends or keeping them all to yourself (no judgment here!), these pops are sure to bring smiles. Enjoy creating and indulging in this delightful recipe!
Vampire Oreo Pops

Get ready for a spooky culinary adventure with these delightful Vampire Oreo Pops! Perfect for Halloween gatherings, these pops are not only cute but also incredibly easy to make, making them a hit with kids and adults alike. With simple ingredients and fun decorating options, you can unleash your creativity while creating a treat that will disappear as quickly as you can say ‘trick or treat!’ Whether you’re hosting a themed party or just looking for a festive dessert, these Vampire Oreo Pops will surely bring smiles all around. So gather your loved ones, roll up your sleeves, and let’s dive into this fang-tastic recipe!
- Prep Time: 20 minutes
- Cook Time: 0 minutes
- Total Time: 20 minutes
- Yield: Approximately 12 servings 1x
- Category: Dessert
- Method: No-Bake
- Cuisine: American
Ingredients
- Oreos
- Lavender candy melts (or any color of your choice)
- Mini vegan marshmallows
- 1–2 teaspoons coconut oil
- Cupcake liners (red, purple, black, green)
Instructions
- Melt lavender candy melts in a microwave-safe bowl at 30-second intervals until smooth.
- Insert lollipop sticks into the cream filling of each Oreo.
- Dip each Oreo into the melted candy melts until fully coated; let excess drip off and place on parchment-lined baking sheet.
- While chocolate is still wet, press mini vegan marshmallows onto the sides of the Oreo to form fangs.
- Place dipped Oreos in cupcake liners and allow to set at room temperature or refrigerate for 10-15 minutes.
Nutrition
- Serving Size: 1 serving
- Calories: 180
- Sugar: 14g
- Sodium: 50mg
- Fat: 7g
- Saturated Fat: 4g
- Unsaturated Fat: 3g
- Trans Fat: 0g
- Carbohydrates: 27g
- Fiber: 1g
- Protein: 1g
- Cholesterol: 0mg