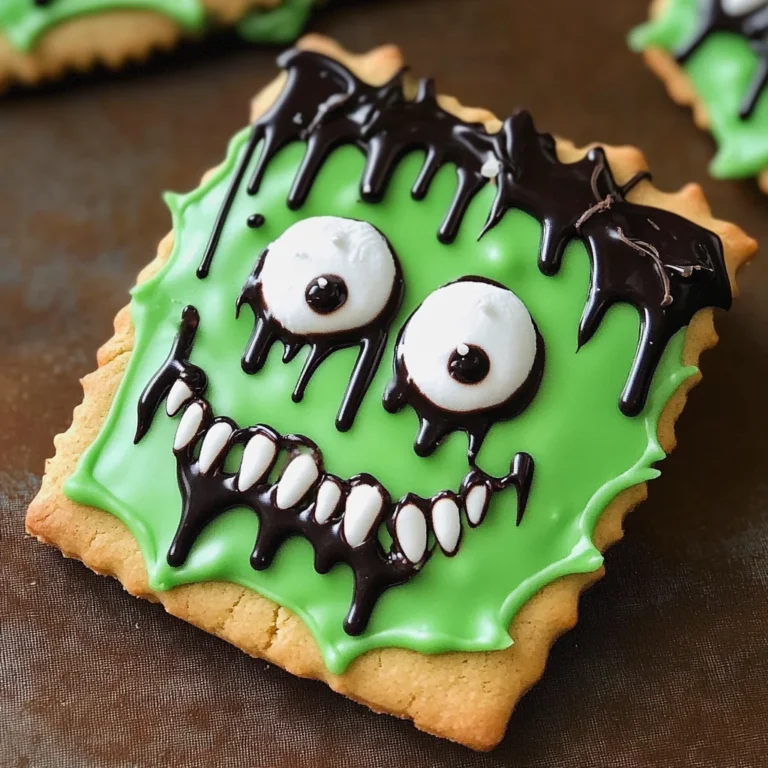
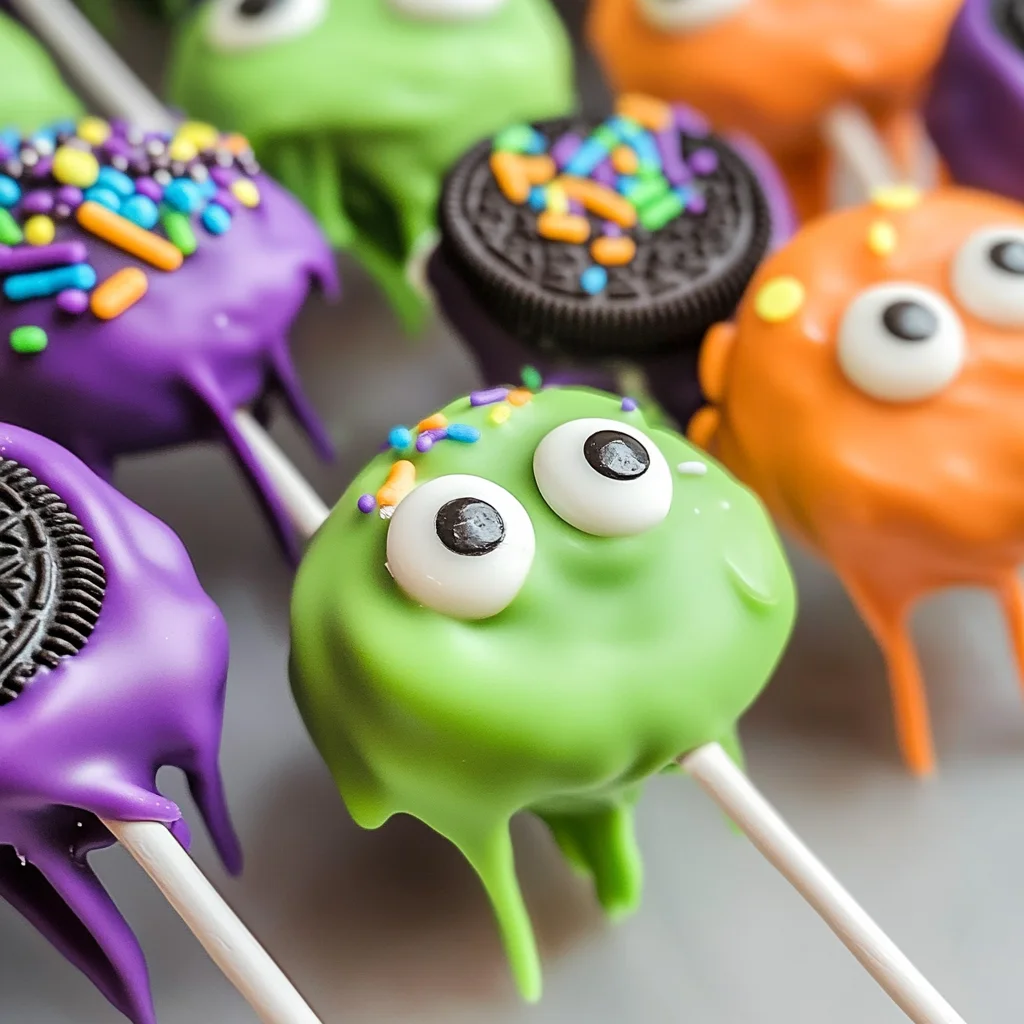
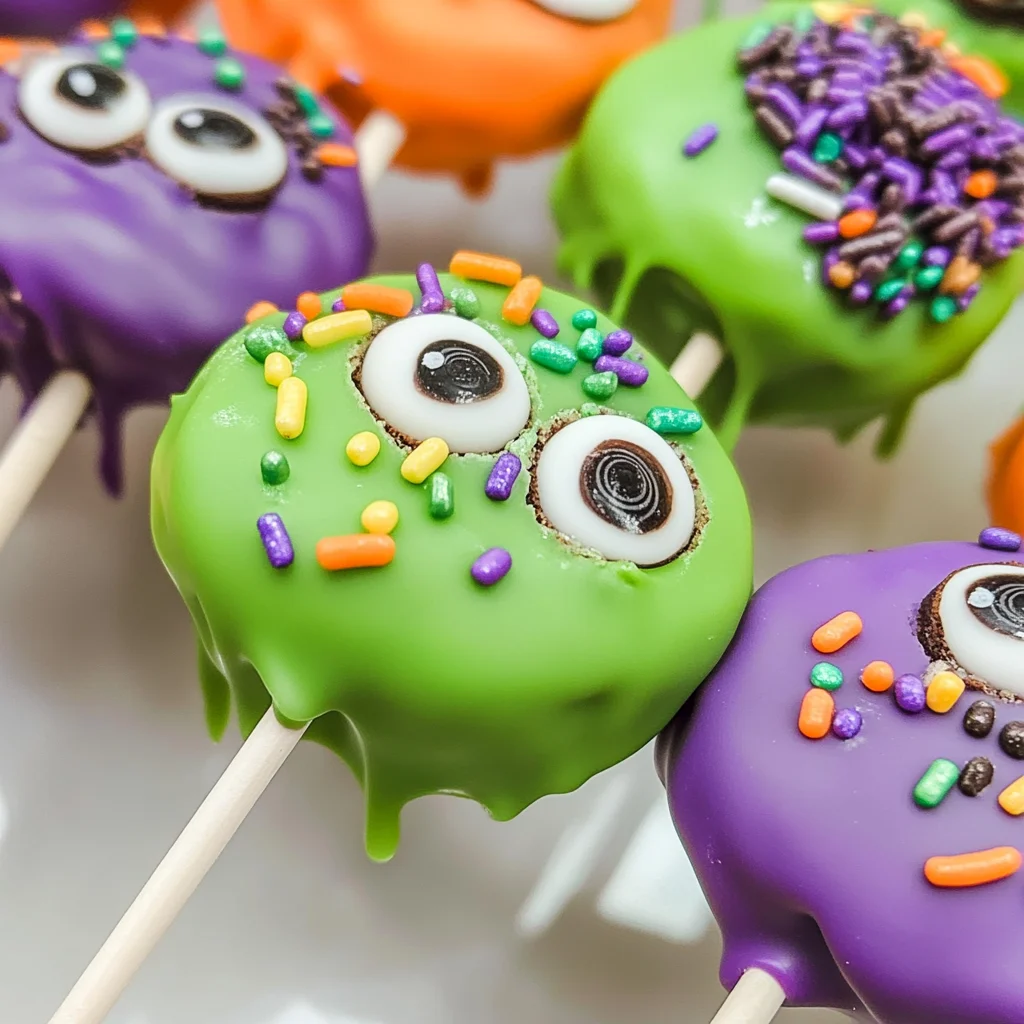
Monster Oreo Pops
If you’re looking for a delightful treat that brings joy and creativity to your kitchen, then you’re in the right place! These Monster Oreo Pops are not only delicious but also super fun to make. Perfect for Halloween parties, family gatherings, or just a cozy afternoon at home, these pops will surely put a smile on everyone’s face. The vibrant colors and playful decorations make them an instant hit with kids and adults alike!
What makes this recipe even better is how easy it is to whip up. With simple ingredients and no baking involved, you can create these little monsters in no time. So, grab your supplies, and let’s get started on making these incredible Monster Oreo Pops!
Why You’ll Love This Recipe
- Quick and Easy: With just a few steps, you can have these pops ready to impress!
- No-Bake Fun: No need to turn on the oven—perfect for warm days or busy evenings.
- Kid-Friendly Activity: Get the little ones involved in decorating their own monster creations!
- Customizable Designs: Let your imagination run wild with colors and toppings.
- Perfect for Any Occasion: Whether it’s Halloween or just a sweet treat day, these pops fit right in.
Ingredients You’ll Need
Gather these simple, wholesome ingredients to bring your Monster Oreo Pops to life! They’re all easy to find and will add a burst of flavor and color to your treats.
- 24 Double Stuffed Oreos
- ½ cup white chocolate melting wafers
- 12 ounces green candy melts
- 12 ounces purple candy melts
- 12 ounces orange candy melts
- 3 Tablespoons Crisco shortening (divided)
- Green, purple, and orange jimmy sprinkles (long not round)
- Candy eyes (multiple sizes)
- 24 Cake pop sticks
Variations
One of the best things about these Monster Oreo Pops is how flexible they are! You can mix things up based on what you have at home or what flavors you love most.
- Change the Colors: Use different colored candy melts like blue or pink for a unique twist.
- Add Flavoring: Mix in some flavored extracts like mint or orange into the melted chocolate for extra zing.
- Swap the Sprinkles: Try using crushed nuts or edible glitter instead of sprinkles for a different texture.
- Dunk in Different Chocolates: Experiment with dark chocolate or milk chocolate melts for varied tastes.
How to Make Monster Oreo Pops
Step 1: Prepare the Cake Pop Sticks
Start by taking each cake pop stick and gently poke a hole about ½ inch deep into the Oreo filling. This step is important because it helps secure the stick within the cookie without breaking it. Just be gentle—no one wants broken Oreos!
Step 2: Melt the White Chocolate
In a small microwave-safe bowl, add the white chocolate melting wafers. Heat them at 50% power for one minute. Stir them well and return to the microwave for additional bursts of thirty seconds until they’re smooth. This melted chocolate will help attach the stick to the Oreo securely.
Step 3: Attach the Cake Pop Sticks
Dip about ½ inch of each cake pop stick into the melted white chocolate before inserting it back into the hole you made earlier. This creates a strong bond as it hardens. Allow each Oreo to rest until the chocolate sets.
Step 4: Prepare Your Colored Melts
Next, take your colored candy melts and place them in deep microwave-safe containers. Heat at 50% power for one minute; then stir and add one tablespoon of Crisco shortening to each container. Continue heating until smooth—it should resemble dressing in consistency.
Step 5: Dip Those Oreos!
Carefully dip each Oreo into your colorful melted candy until fully covered. Give them a little shake side-to-side so that any excess drips off—this keeps them from being too heavy!
Step 6: Decorate Your Monsters
While the coating is still wet, sprinkle on your jimmies and place candy eyes on top! Get creative—the more fun designs you make, the more delightful these pops will be!
Step 7: Chill Before Serving
Finally, allow your Monster Oreo Pops to rest upright in a cake pop stand inside the refrigerator for about thirty minutes. This helps everything set nicely so they don’t fall apart when enjoyed!
Now that you’ve got this fun recipe down, I hope you enjoy making—and munching—on these delightful Monster Oreo Pops! Happy snacking!
Pro Tips for Making Monster Oreo Pops
Making Monster Oreo Pops can be a delightful experience, and a few handy tips will help you achieve that perfect spooky treat!
-
Use Fresh Oreos: Freshly opened Double Stuffed Oreos have a better texture and flavor, ensuring your pops taste great and maintain their shape during assembly.
-
Temperature Control: Keep your melting wafers at the right temperature. Too hot can cause them to seize, while too cool can make them hard to work with. Use bursts of heat in the microwave to control this.
-
Customization is Key: Don’t hesitate to get creative with colors and designs! Varying the sprinkles or using different eyes can give each pop its unique personality, making them more fun for kids and adults alike.
-
Chill Before Dipping: If your Oreos are too soft, pop them in the fridge for a few minutes before dipping. This helps maintain their structure and prevents breakage when inserting the cake pop sticks.
-
Don’t Rush the Cooling: Allow your Monster Oreo Pops to chill completely before serving. This ensures the chocolate sets properly and makes for a cleaner presentation.
How to Serve Monster Oreo Pops
These Monster Oreo Pops are not only delicious but also visually captivating, making them a perfect addition to any Halloween party or festive gathering. Here’s how you can present them to impress your guests!
Garnishes
- Halloween-themed plates: Serve your pops on plates decorated with spooky designs like ghosts or pumpkins to enhance the festive atmosphere.
- Colorful edible glitter: A sprinkle of edible glitter adds an extra touch of magic and sparkle that will catch everyone’s eye!
Side Dishes
-
Fruit Kabobs: Fresh fruit skewers with vibrant colors provide a refreshing contrast to the sweetness of the Monster Oreo Pops. Opt for seasonal fruits like grapes, strawberries, and melon for an appealing look.
-
Veggie Platter: A colorful array of veggies such as carrots, bell peppers, and cucumbers served with hummus offers a healthy balance alongside your sweet treats.
-
Popcorn Bar: Create a popcorn station with various seasonings and toppings. The crunchiness pairs beautifully with the soft texture of the Monster Oreo Pops.
-
Spooky Punch: Serve a fun punch—perhaps a green limeade or orange soda—with floating gummy worms or eyeballs. It adds another layer of festivity while keeping everyone hydrated!
Enjoy making these delightful Monster Oreo Pops, and don’t forget to share your creations! Happy Halloween!
Make Ahead and Storage
These Monster Oreo Pops are perfect for meal prep, allowing you to create a fun and festive treat ahead of time. They store well and can be made days in advance, making them a great choice for parties or holiday gatherings.
Storing Leftovers
- Store any leftover Monster Oreo Pops in an airtight container.
- Keep them in the refrigerator to maintain freshness.
- They should stay good for up to one week.
Freezing
- If you want to freeze these pops, place them in a single layer on a baking sheet until solid.
- Once frozen, transfer them to a freezer-safe bag or container.
- They can last up to two months in the freezer. Just remember to let them thaw in the fridge before serving.
Reheating
- There’s no need to reheat Monster Oreo Pops; they are best enjoyed chilled or at room temperature.
- If they become too warm, simply place them back in the fridge for a bit before serving.
FAQs
If you have questions about making these delightful treats, you’re not alone! Here are some common queries:
Can I use different colors of melting chocolate for Monster Oreo Pops?
Absolutely! You can get creative with your colors. Feel free to experiment with any shades of melting chocolate that fit your theme!
How do I make Monster Oreo Pops without animal-based gelatin?
This recipe is naturally gelatin-free as it uses candy melts and white chocolate instead of any gelatin products. Enjoy your treats worry-free!
How long do Monster Oreo Pops last?
When stored properly in the refrigerator, Monster Oreo Pops will remain fresh for up to one week. Perfect for preparing ahead of time!
What is the best way to decorate my Monster Oreo Pops?
You can use various sprinkles and candy eyes as shown in the recipe. Mix and match colors and shapes for unique designs that reflect your creativity!
Final Thoughts
I hope you find joy in making these delightful Monster Oreo Pops! They’re not just tasty; they bring a sense of fun and creativity into the kitchen, perfect for any occasion. Whether you’re celebrating Halloween or just looking for a sweet treat, these pops are sure to impress everyone. Enjoy creating your own spooky masterpieces, and don’t forget to share them with friends and family! Happy baking!
Monster Oreo Pops

Indulge in the whimsical world of Monster Oreo Pops! These delightful no-bake treats are perfect for any festive occasion, especially Halloween. Featuring vibrant colors and playful decorations, these cookie pops are a hit with both kids and adults. With just a handful of simple ingredients and no baking required, you can whip up these charming snacks in no time. Get your little ones involved in decorating their own monster creations and let their imaginations run wild. Whether you’re hosting a spooky gathering or simply looking for a fun treat to enjoy at home, these Monster Oreo Pops will be the highlight of your culinary adventures!
- Prep Time: 20 minutes
- Cook Time: 10 minutes
- Total Time: 30 minutes
- Yield: Makes approximately 24 servings 1x
- Category: Dessert
- Method: No Bake
- Cuisine: American
Ingredients
- 24 Double Stuffed Oreos
- ½ cup white chocolate melting wafers
- 12 ounces green candy melts
- 12 ounces purple candy melts
- 12 ounces orange candy melts
- 3 tablespoons Crisco shortening (divided)
- Green jimmy sprinkles
- Purple jimmy sprinkles
- Orange jimmy sprinkles
- Candy eyes (various sizes)
- 24 cake pop sticks
Instructions
- Gently poke a hole about ½ inch deep into each Oreo filling using a cake pop stick.
- Melt white chocolate wafers in the microwave until smooth; dip the end of each stick into melted chocolate and insert into Oreos.
- In separate bowls, melt colored candy melts with Crisco shortening until smooth.
- Dip each Oreo into the colored melts until fully coated; shake off excess.
- While still wet, decorate with sprinkles and attach candy eyes creatively.
- Allow pops to chill upright in the refrigerator for about 30 minutes to set.
Nutrition
- Serving Size: 1 cake pop (45g)
- Calories: 160
- Sugar: 15g
- Sodium: 30mg
- Fat: 9g
- Saturated Fat: 4g
- Unsaturated Fat: 5g
- Trans Fat: 0g
- Carbohydrates: 18g
- Fiber: 0g
- Protein: 1g
- Cholesterol: 0mg