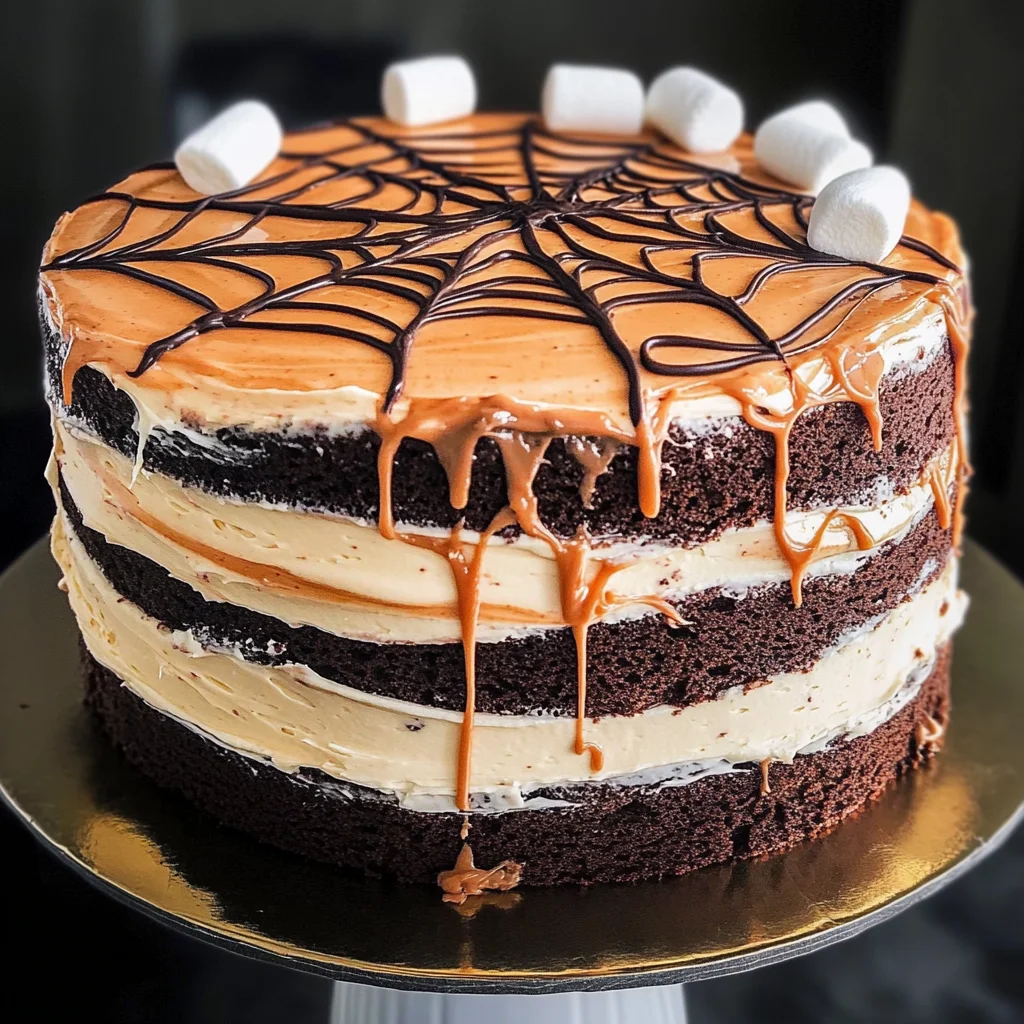
Spiderweb Cake
If you’re looking for a show-stopping dessert that’s perfect for Halloween or any festive gathering, you’ll absolutely love this Spiderweb Cake! This delightful treat combines rich chocolate layers with creamy frosting and a fun, spooky twist. It’s not just for frightful occasions—this cake is a favorite at family birthdays, cozy gatherings, and even casual weeknight dinners. Trust me, when you bring this cake to the table, everyone will be buzzing with excitement!
What makes this Spiderweb Cake so special? It’s surprisingly simple to whip up, yet it looks like a masterpiece. You can easily customize it to fit your dietary needs using all-purpose, whole wheat, or gluten-free flour. Let’s dive into why this recipe is sure to become a cherished addition to your baking repertoire!
Why You’ll Love This Recipe
- Easy to Make: The steps are straightforward and require no advanced skills. Perfect for both novice bakers and seasoned pros!
- Family-Friendly Fun: Kids will love helping out with the decorating—the spiderweb design is an exciting way to get everyone involved.
- Delicious Layers: With rich chocolate cake and creamy frosting, each slice is a heavenly bite that will have everyone coming back for seconds.
- Flexible Ingredients: Whether you’re gluten-free or prefer whole grain, this recipe adapts easily to fit your needs.
- Make-Ahead Option: Bake the cake in advance and frost it just before serving. It tastes even better after sitting overnight!
Ingredients You’ll Need
Gathering your ingredients should be just as joyful as baking! Here are the simple and wholesome components you’ll need for this Spiderweb Cake.
For the Cake
- 3 cups granulated sugar
- 2 1/2 cups + 2 tablespoons flour (see notes)
- 3/4 cup + 2 tbsp Dutch-process cocoa powder
- 1/4 cup black cocoa powder (or more Dutch-process cocoa)
- 1 1/2 teaspoons baking powder
- 1 1/2 teaspoons baking soda
- 1 1/2 teaspoons salt
- 3 large eggs (each 50 grams out of shell, room temp, or use chia eggs – see notes)
- 1 1/2 cups milk (see notes)
- 3/4 cup olive oil (or canola/vegetable oil)
- 1 tablespoon vanilla extract
- 1 cup + 2 tablespoons boiling water
For the Frosting
- 24 ounces full-fat cream cheese (room temperature, see notes)
- 1 cup + 2 tablespoons unsalted butter
- 3 3/4 cups powdered sugar (or more if you like)
- 1 1/2 teaspoons vanilla extract
- pinch of salt
- orange gel food coloring (see notes)
For Decoration
- 2 cups mini vegan marshmallows (see notes)
- plastic spiders
Variations
What I love about this recipe is its flexibility! You can easily adapt it to suit different tastes or dietary preferences.
- Swap the Flour: Use whole wheat flour for a heartier cake or gluten-free flour if you have dietary restrictions.
- Change Up the Flavor: Add a splash of almond extract instead of vanilla for a unique twist on flavor.
- Decorate Differently: Try using colored sprinkles instead of marshmallows for a festive touch.
- Make Mini Cakes: Bake in smaller pans for individual servings that are perfect for parties!
How to Make Spiderweb Cake
Step 1: Prepare Your Pans
Start by preheating your oven to 350°F (175°C). Grease and flour your cake pans well; this helps ensure that your cakes come out beautifully without sticking. Using two round pans gives you those lovely layers that make this Spiderweb Cake so impressive!
Step 2: Mix Dry Ingredients
In a large bowl, whisk together the granulated sugar, flour, Dutch-process cocoa powder, black cocoa powder, baking powder, baking soda, and salt. Mixing these dry ingredients thoroughly helps distribute the leavening agents evenly throughout the batter—this step is crucial for achieving that perfect rise!
Step 3: Combine Wet Ingredients
In another bowl, whisk together your eggs (or chia eggs), milk, olive oil, and vanilla extract until well blended. Gradually add this mixture into your dry ingredients. The combination of wet and dry adds moisture to the cake while ensuring all flavors meld beautifully.
Step 4: Add Boiling Water
Carefully stir in the boiling water until everything is smooth. This may seem unusual at first but trust me—it makes the cake incredibly moist! Pour the batter evenly into your prepared pans.
Step 5: Bake
Place your pans in the oven and bake for about 24 minutes or until a toothpick comes out clean when inserted into the center of each cake. Keep an eye on them! Overbaking can lead to dry layers.
Step 6: Cool Down
Once baked, let your cakes cool in their pans for about ten minutes before transferring them onto wire racks. Cooling is essential here; it allows the cakes to set properly before frosting.
Step 7: Make Your Frosting
While your cakes cool down completely, prepare the frosting by beating together room temperature cream cheese and unsalted butter until fluffy. Gradually add powdered sugar, mixing until smooth before adding vanilla extract and a pinch of salt.
Step 8: Assemble Your Cake
Once cooled completely, place one layer on a serving plate. Spread a generous amount of frosting on top before placing the second layer on top. Cover the entire cake with frosting—don’t worry about making it perfect; we want an eerie yet charming look!
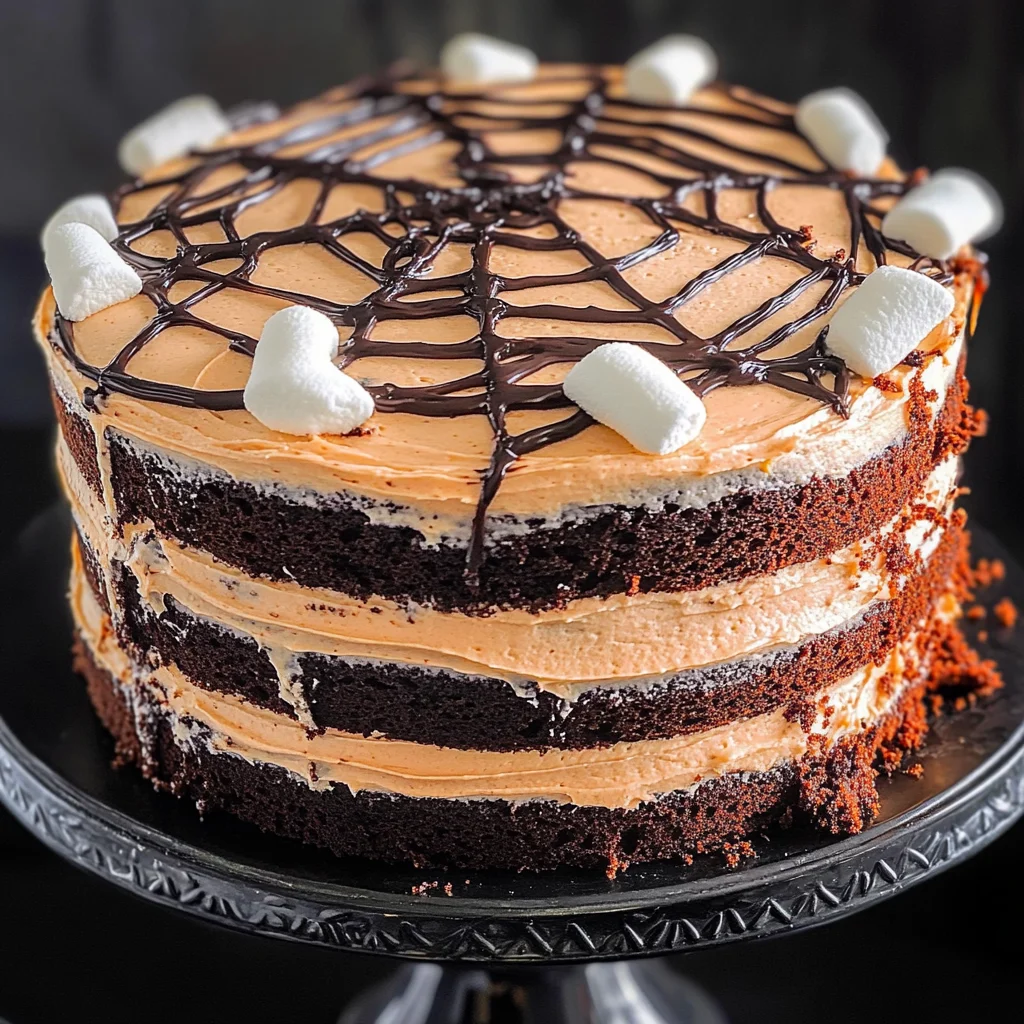
Step 9: Create Your Spiderweb
Using orange gel food coloring mixed with some frosting will help create that iconic spiderweb design. Pipe it onto the top of your frosted cake in spirals, then use a toothpick or knife to drag from the center outward—voilà! A spooky spiderweb effect.
Step 10: Decorate & Serve
Finish off by scattering mini vegan marshmallows on top along with some playful plastic spiders—your guests will love it! Cut into slices and enjoy every delicious bite of this whimsical Spiderweb Cake.
Happy baking! I can’t wait for you to try this recipe and watch those smiles light up around your table!
Pro Tips for Making Spiderweb Cake
Creating the perfect Spiderweb Cake is a fun endeavor, and with these tips, you’ll be a baking superhero in no time!
-
Use room temperature ingredients: Bringing your eggs and cream cheese to room temperature ensures they mix smoothly, creating a light and fluffy frosting that clings to the cake beautifully.
-
Sift your dry ingredients: Sifting flour and cocoa powder helps avoid lumps and creates a lighter texture in your cake. This simple step ensures even distribution of ingredients for a consistent flavor.
-
Let the cake cool completely: Allowing your cake layers to cool entirely before frosting them prevents the cream cheese frosting from melting. This will help you achieve that perfect spiderweb design on top!
-
Experiment with flour types: Whether you choose all-purpose, whole wheat, or gluten-free flour, just make sure to weigh your flour for accuracy. Different flours can change the texture slightly but will still yield delicious results.
-
Color your marshmallows carefully: When adding orange gel food coloring to your marshmallows for the spiderweb effect, start with a small amount and gradually increase until you achieve your desired shade. A little goes a long way!
How to Serve Spiderweb Cake
Presenting your Spiderweb Cake can be just as thrilling as making it! Here are some delightful ways to serve this spooky dessert that will impress both kids and adults alike.
Garnishes
- Edible glitter: A sprinkle of edible glitter adds an enchanting sparkle that complements the spooky theme.
- Fresh mint leaves: Placing a few mint leaves on serving plates gives a pop of color and freshness against the dark chocolate layers.
Side Dishes
-
Pumpkin Spice Whipped Cream: Light and fluffy whipped cream infused with pumpkin spice adds a seasonal touch that pairs perfectly with the rich chocolate flavors.
-
Cinnamon Sugar Roasted Apples: These warm, sweet apples provide a delightful contrast to the cake’s richness. The cinnamon brings in cozy fall flavors.
-
Spooky Fruit Salad: Mix together seasonal fruits like oranges, grapes, and blueberries for a refreshing side that balances out the sweetness of the cake.
-
Classic Vanilla Ice Cream: A scoop of vanilla ice cream gives a creamy complement that melts beautifully against each slice of cake.
With these tips and serving suggestions, you’re ready to delight everyone at your next gathering with this show-stopping Spiderweb Cake! Enjoy every bite!
Make Ahead and Storage
This Spiderweb Cake is not only a delightful showstopper for any Halloween gathering, but it also lends itself perfectly to meal prep. You can make it in advance and store it for later enjoyment, making it a stress-free addition to your celebrations.
Storing Leftovers
- Wrap the cake slices in plastic wrap or store them in an airtight container.
- Keep the cake at room temperature for up to 3 days. If you want to store it longer, refrigerate.
- For best flavor, allow refrigerated cake to come to room temperature before serving.
Freezing
- Wrap individual slices tightly in plastic wrap and then place them in a freezer-safe bag or container.
- The Spiderweb Cake can be frozen for up to 2 months.
- To thaw, leave the slices in the refrigerator overnight or let them sit at room temperature for a few hours.
Reheating
- If you prefer your cake warm, preheat your oven to 350°F (175°C).
- Place slices on a baking sheet and cover loosely with aluminum foil.
- Heat for about 10-15 minutes until warmed through.
FAQs
Here are some common questions about making this delicious Spiderweb Cake.
Can I make this Spiderweb Cake gluten-free?
Absolutely! Simply substitute the all-purpose flour with a gluten-free flour blend. Make sure the blend you choose can be used as a one-to-one replacement for regular flour.
How do I achieve the spiderweb effect on my cake?
To create the spiderweb design, use melted vegan marshmallows mixed with orange gel food coloring. Drizzle it over the top of your frosted cake and create swirls with a toothpick or knife!
What can I use instead of eggs in this recipe?
You can use chia eggs as an egg substitute. To make one chia egg, combine 1 tablespoon of chia seeds with 2.5 tablespoons of water. Let it sit for about 15 minutes until it forms a gel-like consistency.
How long does the Spiderweb Cake last?
When stored properly, the Spiderweb Cake lasts up to 3 days at room temperature or about one week in the refrigerator. For extended storage, consider freezing individual slices.
Final Thoughts
I hope you enjoy making this enchanting Spiderweb Cake as much as I do! With its rich chocolate layers and whimsical marshmallow topping, it’s sure to bring smiles and delight to your Halloween festivities. Don’t hesitate to get creative with your decorations and share your spooky creations! Happy baking!
Spiderweb Cake

If you’re searching for a delightful centerpiece for your next gathering, look no further than this enchanting Spiderweb Cake! Perfect for Halloween or any festive celebration, this rich chocolate layer cake is adorned with creamy frosting and a whimsical spiderweb design that will impress guests of all ages. With its easy preparation, kid-friendly decorating options, and customizable ingredients, this cake is sure to become a favorite at family gatherings, birthdays, and cozy dinners alike. Indulge in the delicious flavors while creating lasting memories in the kitchen—let’s get baking!
- Prep Time: 30 minutes
- Cook Time: 24 minutes
- Total Time: 54 minutes
- Yield: Approximately 12 servings 1x
- Category: Dessert
- Method: Baking
- Cuisine: American
Ingredients
- 3 cups granulated sugar
- 2 1/2 cups flour (all-purpose or gluten-free)
- 3/4 cup Dutch-process cocoa powder
- 1 1/2 teaspoons baking powder
- 3 large eggs or chia eggs
- 1 1/2 cups milk
- 3/4 cup olive oil
- 24 ounces full-fat cream cheese
- 2 cups mini vegan marshmallows
- Orange gel food coloring
Instructions
- Preheat oven to 350°F (175°C). Grease and flour two round cake pans.
- In a large bowl, whisk together sugar, flour, cocoa powders, baking powder, and salt.
- In another bowl, mix eggs (or chia eggs), milk, oil, and vanilla extract until combined.
- Gradually add wet ingredients to dry ingredients; mix until smooth.
- Stir in boiling water until well blended. Pour batter into prepared pans.
- Bake for about 24 minutes or until a toothpick comes out clean. Cool in pans for 10 minutes before transferring to wire racks.
- For frosting: Beat cream cheese and butter until fluffy; gradually add powdered sugar and vanilla.
- Once cooled completely, frost the first layer; place the second layer on top and frost the entire cake.
- Use orange gel food coloring to create a spiderweb design on top with piping or a toothpick.
- Decorate with mini vegan marshmallows and plastic spiders.
Nutrition
- Serving Size: 1 serving
- Calories: 420
- Sugar: 48g
- Sodium: 300mg
- Fat: 22g
- Saturated Fat: 5g
- Unsaturated Fat: 15g
- Trans Fat: 0g
- Carbohydrates: 52g
- Fiber: 2g
- Protein: 5g
- Cholesterol: 70mg